
Want an easy to make bread? This one is super simple, doesn't require a bread machine or complicated loaf making. It doesn't really require any attention at all.
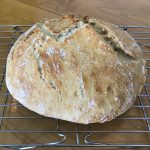
It produces a nice crispy crust with a soft and fluffy inside. So good!
Simple Homemade Rustic Bread
This is about the easiest bread to make. It's flavorful too, and only 4 ingredients!
Equipment
- Cast Iron Dutch Oven
Ingredients
- 3 C All Purpose Flour
- 1 3/4 tsp Salt
- 1/2 tsp Active Dry Yeast
- 1 1/2 C. Water Warm (about 110 deg F)
Instructions
Prep - The Day Before Cooking
- In a large glass bowl, combine the flour, salt and yeast.
- Mix in the water till the mixture comes together and most of the dry stuff is incorporated.
- Cover the bowl with plastic wrap and let sit 12 hours or more. (I usually let it go 18 to 20 hours)
Cooking
- Preheat the oven to 425 deg. F (You might need to go up to 450 deg. depending on your oven)Place the dutch oven (Or other metal oven-safe cooking vessel) on the bottom rack and let preheat for at least 30 min.
- Turn the dough out onto a heavily floured surface and make into a ball. Cover and let stand while oven preheating.
- Once the oven is preheated and the pot has been in there for 30 min to also preheat, toss (throw? - it's really hard to "place" anything into a 400 degree pot) the dough-ball into the pot. Cover and bake for 30 min.
- After 30 min, take the lid off the pot and bake for another 15 min.
- Turn bread out onto a rack to cool.
Notes
This bread is super simple to make. It is only 4 ingredients and doesn't require punching down, complicated loaf making, or a bread machine.
We have used an enameled pot. But we prefer the taste of the bread cooked in the cast iron better. If you don't have a dutch oven, you could try just a cast iron frying pan. You would need to cover it, preferably with another frying pan, but I'm guessing aluminum foil would work.
We chose to try this bread because it doesn't have sugar in it. All the flavor comes from the yeast interacting with the flour and salt over time. The longer it is left to mingle, the better the flavor. Also, the texture is better.
And we have tried this with a gluten-free flour mixture. It didn't work as well. But you can certainly try it. If the yeast doesn't react as much, it could be that the gluten-free flour doesn't have as much for the yeast to eat. You could try adding a pinch of sugar for them.
This bread comes together really easily. When you first mix it though, it might not seem like it has enough liquid.
It probably does. Even if it looks like this.


After about 10 hours it really will start to come together.
Before you cook it it will look at least as moist and bread-dough like the picture at the left (That was about 18 hours after it was started).